Sunday, October 2, 2011

3 Month update

It has been 3 months to the day since I have started this project. I have shot myself in the foot a few times, and lost a few plants, but I have learned a lot. And I have now harvested my first hydroponic grown plants. Just a few days ago I picked two nice bell peppers. Today I have picked my first tomato.

Here is a breakdown of where I am at.

Tomatoes

If you look at my first picture of the tomato clones you will see two buckets with about 8" cuttings. It took about a week for the roots to show on these. These two plants are doing fine. One is 6 foot tall and the other about 4 1/2 feet. That plant was initially set back as I tried to grow it on miracle grow plant food. It is an early girl variety. Here it is now with a picture of the first ripe tomato from my new garden. The second photo is another early girl clone that was cut from the same plant about 2 weeks later. I rooted it in my aeroponic system and much to my surprise the roots appeared in only 3 days. This plant is now healthy and about 3 foot tall.


I now have a total of six tomato plants in individual bucket systems. And I have several more seedlings that will have to be transplanted in a few weeks.

Here are a few more additional photos showing the size of the plants next to my wife who is 5'2" tall.


I have started the plants on shelves and I have repeatedly moved them down a notch as the grow nearer to the lights. The next move will put them on the floor. That will give me a maximum height of about 7 1/2 feet as I have a 8 foot ceiling, but I have to leave a little room for the lights. If you will notice there is a yellowish tint to the light. Just two weeks ago I added a high pressure sodium bulb which has a color temp of about 2000K. This bulb is geared to promote budding. My biggest tomatos are now starting to show signs of small buds. From the looks of things these plants will have numerous tomatoes.

There is also a photo of my wife seated next to two bell peppers. Since the photo shoot I have picked these peppers. I must confess, as I cheated on these pepper plants. They were in my garden this summer. The plants were still healthy, so three weeks ago I dug them up, washed the dirt off the roots and then tranplanted into their own bucket systems. If you will look close in an additional photo you will see some new leaves and buds on these plants. I am really excited about these peppers, as it was only an experiment, and they seem to be doing quite well.


Cucumbers

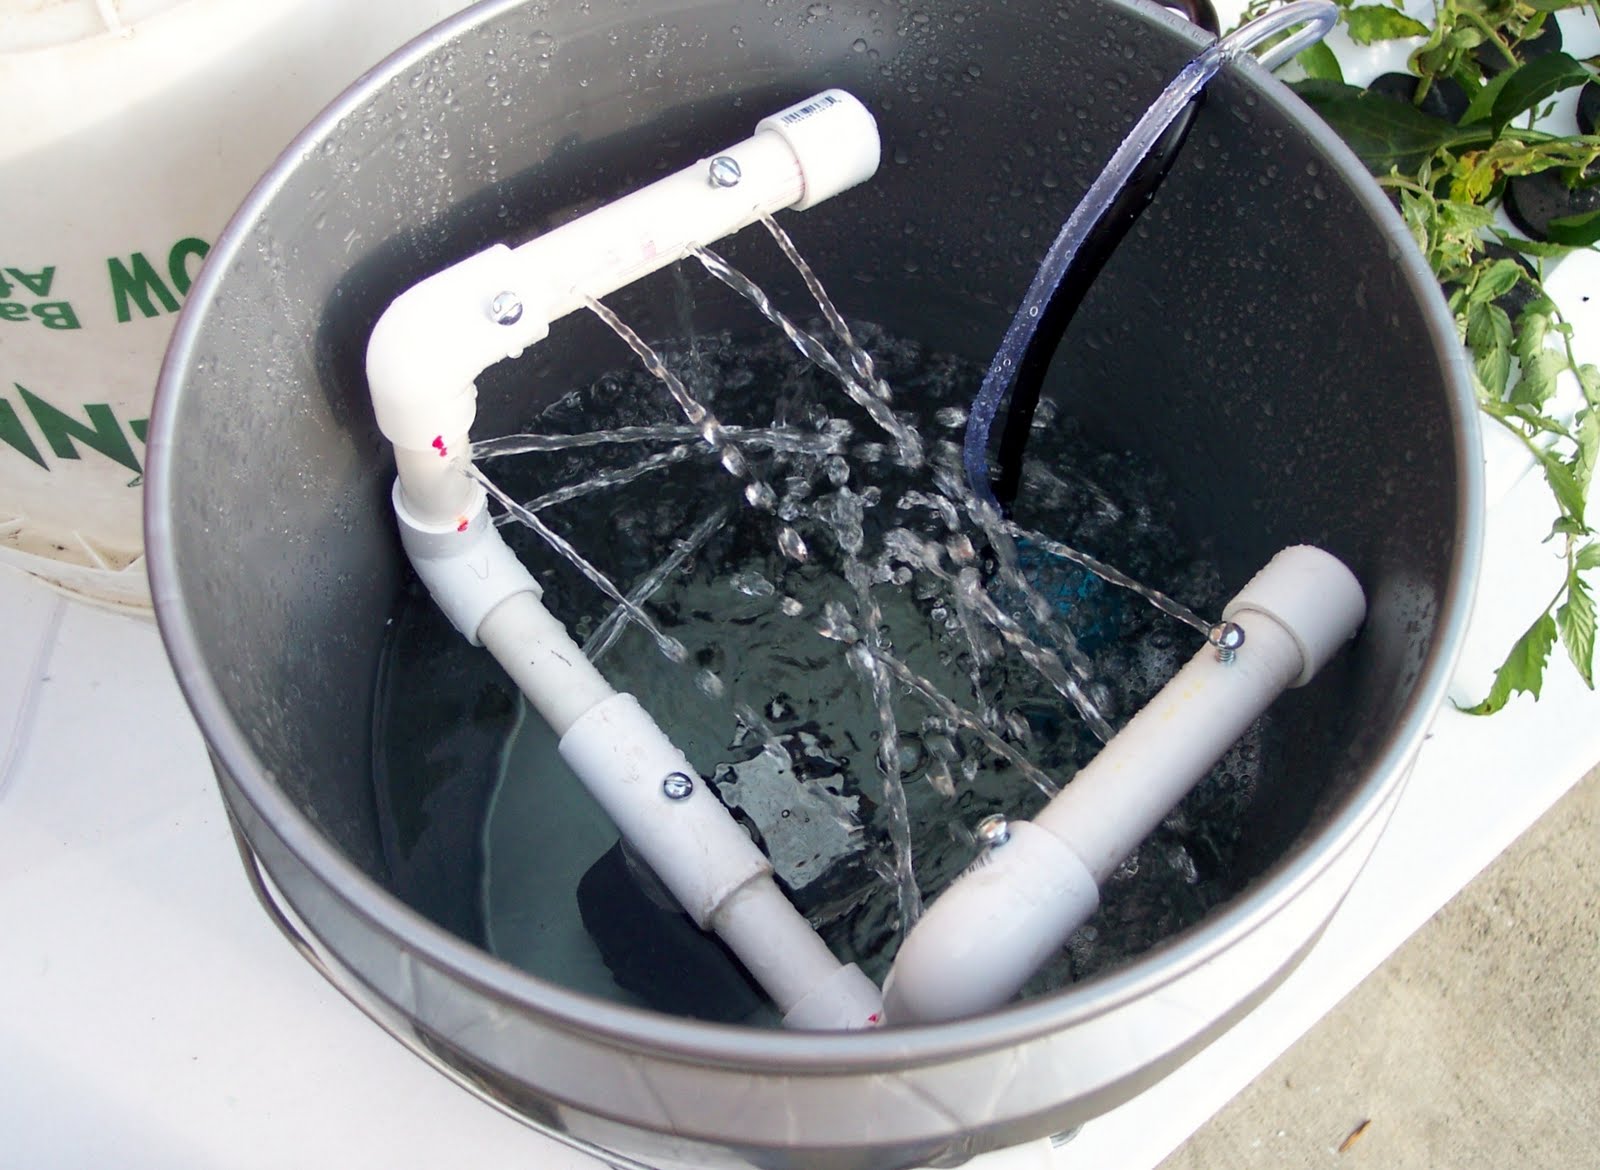
I started these plants from seeds. This first plant is in an aeroponic system run on a timer that kicks on for one mintue then off for 10 minutes. This plant is 2 foot tall and continues to chase the light. I have a trellis on the top of the bucket. I originally thought that I would have to train the plant up. The plant beat me to it. There is little green runners that reach out and wrap around anything in order to support itself. Even my light cord. Surprisingly thse runners are quite strong. This plant is now two foot tall and starting to bloom. If you will look closely in the photo you will see a tiny cucumber right behind the blossom. This is a female cucumber bud. When the pedals open up it will have to be fertilized or the fruit will not develope. The cucumber plant has both male and female flowers. When the female flower is ready I will take a tiny paint brush and dab it on the stamen of the male flower to get a little pollen and then dab it again on the female flower. Normally bees and wind would accomplish this task, but since the plants are indoors I will have to do the fertilizing.

This plant has a four foot trellis and a brooder lamp fixture that is right down on top of plant. As the plant grows I just move it up. I have screwed in a Y adapter and added one 23 watt 6500K cfl and one 23 watt 2700K cfl. Both of these bulbs put out equivalent to a 100 watt incadesent light. The 6500K bulb spurs vegatative growth and the 2700K promotes budding.

I also have two other cucumber in deep water culture systems, which are no more than a 5 gallon bucket with an airstone in it to keep the nutrient solution well oxygenated.

Potatoes???

Well I had not planned on this, but one day while I slept my wife dug up a late planted potato plant that did not have enough time to mature due to looming frosts that was soon to come. So she broke the plant and roots off of the original potato an placed it in a spare hole in my aeroponic systems. After one week the potato seemed to be doing fine, so pulled it up to look at the roots and much to my surprise there was tiny pea sized potatoes on them. In a couple of days the potatoes grew to quarter size! Amazing growth rate. I am now thinking about starting another system just for potatoes.


NASA's Potatoes

Be sure to click on this video link on NASA potatoes.

Other plants to come.

This photos shows some zucchinis that I have sprouted. They will soon have their own bucket systems.


I currently also have onions in my system, and will also soon transplant okra, eggplant,and a couple types of dwarf tomatoes. I have got quite a system going here. Kind of sounds like a tropical fish store here now as there is a lot of flowing water and bubbles.

Sunday, September 11, 2011

Future plans


There is no doubt in my mind that I will do much less soil type gardening and much more hydroponics. The reasons are simple. No need to worry about nutrients, and water. It is easily monitored with hydroponics, and not so easy when it is in the soil. No need to worry about harmful pests, microbes, etc..

My systems are rapidly growing and I have no where to put the new plants. Check out my mister box. I now have cukes, peppers and more tomatoes that will soon need transplanting. My solution is to build a aeroponic rail system. I will provide a few links to a great DIY guys youtube, and also where you can buy a good system. Systems run from about $700-$1200. I think I can make one for about $300.

Super Cropper About $700.

Grow Maxx Grow Maxx 35 about $1200.

Both of these are super systems.

DIY Guy This guy built his own. It is a very nice system. I would guess it cost $500 plus. He has a lot of plumbing that I would not use with the system I plant to build.


building rails And here is how he actually built the rails. Also you can find links to his other projects here.

I will head to Home Depot and Lowes tomorrow and buy a couple of vinyl fence posts so I can start on my system.

By the way, I just got two heavy duty plastic boxes delivered to my door from Lowes for $$2.56 each plus a grand total of $7.00 for S&H. They did not have any in stock at my local Lowes so I ordered them from their web site. I think they made a mistake by listing them so cheap. I am very happy with them. Each are 17 gallons.

And here is one more photo of my cloner box that is loaded with plants that will soon need a new home.

Plant support and lighting


I have had to learn the hard way. My very first tomatoes have no supports. If you will notice in earlier photos they are leaning against the wall. Well, I waited too long and they simply grew too fast. I am afraid to try adding support as I might damage the plants.

On my newer plants I have come up with a trellis system. You can get tomato cages and/or trellis at Lowes or Home Depot. I already had a few cages. I also got a couple of the tomato trellises for $6.00 each. You can make three supports from these as they are flat and can easily be taken appart and bent to suit your needs.

All I did was bend in a circle fashion and then drill holes in bucket lid, insert wires in holes and then bend them over for support. I also discovered that I could get brooder lamps and insert them right over the plants by sliding them down inside the wires. You can move them right down on top of the plants and move them up as the plants grow. These brooder reflectors can be bought for about $9.00 each at Walmart, Lowes, or Tractor Supply. I am using a 23 watt 6500K CFL which is equivalent to 100 watt incadensant. When I want the plant to bloom I convert to a 2500K bulb which is more of the red light spectrum. You could also screw in a Y if you wanted to add two bulbs. This is the ideal setup for bucket systems, as you can lift the lids to check your solution and the plant and all will still be supported with the trellis.

Notice my cucumber. It has doubled in size since I took this photo a week ago. Should be picking cukes in 5-6 weeks.

Saturday, September 10, 2011

2 month updates


Seems hard to believe that two months have already elasped since I started this project. My regular garden is pretty well gone, but I still do have tomatoes, peppers and some pole beans. The quality is starting to go down hill, but they are still better than store bought.

It seems that I learn something new every day. Here is my latest updates.

There is now no doubt in my mind that short cut to nutrient solutions is a no no. I first started with Green Air Products hydroponic nutrients on one tomato and then used miracle grow on another tomato. All looked good for a couple of days. After one week there was a noticable different. The GAP was twice as big and the main stalk was much thicker. So now I have converted all to GAP nutrients. I just today ordered two gallons of GAP nuets. One gallon each of the micro base, and grow solutions. They are pricey at $27, but highly concentrated. Each gallon will make 768 gallons of solution. I have yet to use the GAP bloom solution. I will do this with a couple of my early buckets later on this weekend. I will also cut my lights back to 12 hours today to encourage blooming and fruitation. Kind of funny since I had several of my plants outside and they were already blooming due to the shortening of the days. My biggest hydro tomatoes are now near tennis ball size. Since they are of the early girl variety, I expect them to be ripe by early Oct..

And here are some of my latest pics. Actually these pics are two weeks old. The tomatoes are clear to the ceiling now, and I will have to move the buckets off of the shelves and set on the floor. Once I cut the light back and add the bloom nuets I am hoping vegetative growth will slow down.

If you will notice, in the background I have sheets of styrofoam insulation with foil backing. I already had several sheets laying around, and they make the ideal light relector. Eventually I will make a grow closet around my plants. That way light will remain concentrated to encourage maximum growth.

Monday, August 29, 2011

Expansion with aeroponics


This is my latest cloner box. Notice that I have plenty of misters in this box. This mist of nutrient rich water provides the ideal medium for rooting cuttings and also provide maximum growth for new plants. I have now been rooting tomato cuttings in as little as three days. I transplant my seedlings to a mister box in 2" netcups after the first week after sprouting. Large plants I move into a box with 3" net cups.

I have also noticed that misters in buckets do much better than deep water culture for tomatoes. I have converted most of my buckets to aeroponics now.

There are a few problems associated with the misters. They have tiny holes and they get stopped up frequently with almost anything. They are not hard to unplug, but it is messy and ot does take time. I am now building my bucket systems with 1/16" drilled holes in the pvc pipe in leau of the misters. It seems to work just as good and does not stop up so easily.

I will still use the misters in my cloning box and early plant growth boxes.

Saturday, August 27, 2011

Day 28


Everything is coming along just fine.

My cloner box is clear full now. Actually there are only 4 clones in the box. Each corner has one tomato. The remaining holes are filled with seeds that have sprouted. They include tomatoes, cucumbers, and bell peppers.

The tomato cuttings were given to me by a co-worker. They had been wrapped in a wet paper towel for a day and were in poor shape. I started with 5 and was able to save 4. Each one is held in place by a neoprene plug. These are ideal for cloner cuts. I put these tomatoes in the box just two weeks ago. Today I removed one and there was a 10" root mass. It now is in a bucket by itself.

The remaining holes all have sprouted seeds. I have used Walmart polyfill in net cups for several of the seeds. This worked ok and it was cheap. However the rapid rooter cubes which is made of coco fiber worked the best. All of the rooting media was placed in a 2" net cup. Most of those seeds germinated in only 24 hours. I am hard pressed to keep up with all of the transplants.


Tomorrow I will have to start another box.

The top photo is my seed box. It is actually a Sterlite shoe box with about 2" of perlite in the bottom. I saturated the perlite with a weak solution of nutrients.
If you look closely you will see a tomato seedling that strayed from my plug. Also I have some seeds in a damp paper towel. They will germinate, but they are very delicate and have to be moved, so I decided to plant all seeds in a rapid grow plug or some other starter media.

Friday, August 12, 2011

Week 2 - New Additions


Everything is moving right along. I now have three more systems to launch this weekend. Whoops! I have actually launched one today. I created a cloner box, which was very easy to build and cheap too.

You can buy one of these units online for about $35.00, but I made mine for less than $10. All items were purchased at Walmart and a hydroponic supply house.

Sterlite plastic shoebox - $1.00

8 neoprene 2" inserts at 35 cents each $2.70

1 air stone at $1.25

Total cost - $4.95.

The neoprene inserts are pretty neat as they have a cut on one side so you can open them up and insert a stem from whatever plant you are cloning. These inserts are reusable.

It did not take more than 15 minutes to build this entire box. All I did was cut out 8 1 3/4" holes with a hole saw and insert the cloners. Cut your stems at a 45 degree angle, place in insert and then in box. Fill the box with water and add a 1/4 teaspoon of nutrients, add the airline and you are ready to go. Roots should appear in about 1 week. I now have this box filled with tomato and pepper cuttings.

My next system is an airiponics bucket system. This system requires a little bit of work, as you must cut and fit several pieces of pvc pipe, glue them together, and then drill and tape 11/32 holes and add some mister spray heads. I configured the pipes so that they would reach around the bottom of the nettie pot. When you fire this system up there is a mist of water that sprays in all directions inside the bucket.

Total cost was under $40.

Bucket - $2.50
Net pot lid - $5.50
7 pvc fitings at $.30 each - $2.10
3 feet of 3/4" pvc pipe at 30 cents. $.90
7 misters nozzles at 35 cents each - $2.45
Water pump $17.00

Total $30.45


I finally got around to shooting some new photos. It has now been three weeks since I first started my two tomato cuttings in net pots in deep water culture buckets. Today I moved them inside and applied the lights which are timer controlled and will be on for 18 hours per day.

The pic showing the roots was shot last Friday which was day 12. Today those roots are twice as large. I decided with was time to change my solution and move them inside. So this time I increased my nutrient dosage to full strength and then adjusted my ph. It is critical to adjust your ph to about 6 for tomatoes. I also measure and adjust my ppm on my nutrients to 500. My normal tap water is about 140 ppm.

I am using a control bucket where I have one tomato that I am using MiracelGrow Tomato Food. I wanted to see how well local commercial nutrients would work in my hydro systems.

I next rigged up a light that is very simple and cheap to construct. All it took was one section of aluminum stove pipe that is approx. 30" long. I spread the stovepipe and held it in place by using two 1/4" pieces of all thread and 4 nuts. I then inserted a dual lamp fixture in the top of the reflector. Next I hooked up two pieces of chain, then attached an old extension cord to the light fixture. I then added one each soft white, and daylight cfls.

Cost was about $12 for the entire fixture.

Stovepipe - $4.00
Ligh fixture - $1.50
All thread - $2.00
CFLs - $4.00

This system works great. I do not think you can tell from the photos but the softwhite bulb is of the blue wavelength which spurs vegetative growth, and the daylight is of the red wavelength which promotes flowering and budding.

When you buy these cfls at the store they all look the same. I can assure you that when they are lit you can tell the different. Both are 20 watts, and equivalent to 100 watt incandescent bulbs. You can find these clear up to 65 watt which equates to a 300 watt incandescent.

By the way, I now have my first tomatoes set on. Wasn't expecting anything this fast.

Saturday, August 6, 2011

MY FIRST SYSTEM


I now have my first system up and running. It is a deep water culture (DWC). It is the simplest and cheapest system to build. It is nothing more than a 5 gallon bucket with a special lid that has a builtin 6" net pot. There is a 6" Sure To Grow insert and a air pump, air hose, and air stone.

Total cost. $20.80

5 gallon bucket. $2.80
Net pot lid $3.50
Sure to grow insert $4.00
Air pump $10.50
Air stone $2.00
Air hose 25' $2.50

I purchased all materials at Lowes and Walmart. The air pump has two outlets, so I am using it on two buckets. You could get a larger air pump for about $30 and use it on multiple buckets.

Friday, August 5, 2011

AEROCUSTOMS, A GREAT SUPPLY SITE


There is where I buy most of my hydroponic supplies. This company has excellent prices and is very reasonable with shipping charges and prompt too. I usually place an order and it is on my door step in three days. The picture is a very good cloner system which is used to develope roots on cuttings. Works great with tomato plants. This system is less than half the cost of most competitors. Or if you are like me, you can make your own system for less than $50.

AEROCUSTOMS

Wednesday, August 3, 2011

SURE TO GROW, THE WAY TO GO

Sure to grow is a great site with many wonderful products and also several how to build your own videos. Check this site out as I have modeled my systems after the systems being demonstrated by Sure To Grow.

SURE TO GROW

Monday, August 1, 2011

Growing Hydroponic Tomatoes


While I am busy assemblying my hydroponic garden, I thought I could wet your appetite by providing a few good links to sites with some great hydroponic basics.

This first site is execellent and is hosted by the Ag Dept at the University of Arizona. http://ag.arizona.edu/hydroponictomatoes/ There is a lot of good material on here that can easily be applied to any type of tomato gardening as well as hydroponic.

Sunday, July 31, 2011

New photos for garden plot


These photos were shot on July 23. As can see the garden is growing rapidly. I have already picked several tomatos, cucumbers, and bell peppers.

Saturday, July 30, 2011

A new direction for my gardening


I have been a lifelong gardener. Each year I can hardly wait until spring arrives and it is time to set out my new plants. I have always loved fresh veggies, something that I miss greatly during the long winter months.

I have a great garden right now. It is small but robust. Plenty of cucumbers, tomatos, bell peppers and soon beans. I have had to battle the deer for the past several years and was about to give up. Then one day I remembered that I had an old 10x10 kennel that I could put up and keep the deer at bay. Well, it has worked to perfection. These intial photos were shot on July 3. I have not only kept the deer out, but also provided a place to train up my cucumbers, tomatos and beans.

But, one thing I have not accomplished, is how to provide those wonderful plants and fruits during the winter months. Well folks, that will soon change as I am about to jump headlong into a journey called hydroponic gardening. I have already ordered material and will be giving your regular updates as time goes by. Stay tuned.